Following on from moving across to the new site, this is another historical catch up post. I had prepped most of the parts for this in April 2018 and then finally built up the courage to put it all together in September 2018
The first lesson here is rtfm…
The drive shafts and CV joints were a gunky rusted up mess so I assumed they’d need a clean up / respray and got to work stripping them down. I then took a look in the service manual to make sure I didn’t miss anything and there is a note in there saying DO NOT DISASSEMBLE on the outer CV joint . Real facepalm moment. Good way to understand how something works though! The relevant section for the driveshafts is 3-13 or page 350 of 736
For the outer CV joints, this video was also on repeat pretty much in the garage. Excellent content and covered the gaps for the DO NOT DISSASSEMBLE.
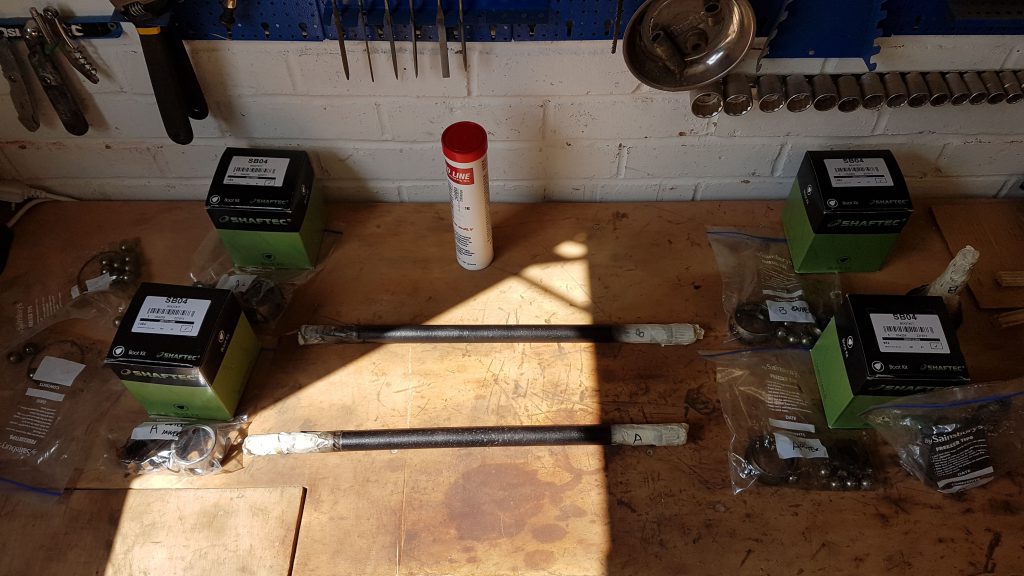
Into my personal experience along with photos. To get started we have a set of cleaned up & new parts. For this job you will need
- Driveshafts, rings, cages, balls and snap rings from the donor (all cleaned up and resprayed as appropriate)
- Some CV joint grease (after a bit of research I went for Red Line CV-2)
- 4 x CV Boot Kit
- New snap rings for the half shafts into the diff
- Usual tools to coerce uncooperative parts into place, plus a grease gun and a rubber mallet
Let’s tackle the outer CV joint first. You can see why the service manual says not to disassemble it! The parts are asymmetrical and therefore will only go in one way. My tips from having completed this are;
- Watch the video above a few times before doing anything
- Do a dry fit of the cage, inner ring and balls a couple of times (without the grease or drive shaft). This will make you really comfortable with how it all goes together
- When you go for it, put the half shaft in a vice and be liberal with the red moly. You can always clean the excess off
- If it’s really not going, you are probably out of sequence. Don’t force it
- Don’t expect the drive shaft to be able to go in and stay in until the balls are all in place. I was trying to use it at leverage at times. With hindsight this is a bad approach.
- Instead use a mallet to persuade the cage into position for the next ball
- Swear… Get it all out… It helps!
- You can get away with leaving the boot off the driveshaft until the last moment here as you don’t have a CV joint on the other end
- Don’t forget to release and squeeze extra air out of the CV boot
If anyone has any tips for getting the inner boot clamp (the smaller one) nice and tight here I’m all ears by the way. I’ve struggled with it but it’s currently on my snag list for later


Next up is the inner CV joint. This is a doddle compared to the outer and easy enough for me to go step by step
- Put the boot on the driveshaft (I assume you have the opposite end with a CV joint on)
- Slide the cage on the shaft carefully with the wider end back toward the diff / inner end)
- Put the inner ring on the splines and gently persuade into place with a hammer and long socket (24mm in my case)
- Fit the snap ring to the end of the driveshaft with some circlip pliers
- Move the cage over the inner ring and dry fit all 6 balls. Don’t move it around too much here as they will fall out pretty easily
- Put the half shaft in a vice and apply red moly liberally
- Carefully slide the cage, inner ring and ball assembly into the half shaft then give it a good squidge around in all directions. Try to get all air worked out of the assembly
- Fit the outer ring to help keep everything together
- Fit the CV boots and clips
Again… Open to hints on getting those smaller boot clips right


The home stretch is safely getting the driveshaft into the diff. I can’t remember why but I’ve had these in and out a number of times. Key tips are
- When putting the drive shafts into the diff, strike it firm and square. It should be seated after only a couple of whacks
- Try not to do it too much. If the snap ring on the tip of the half shaft snaps you will be left with metal in the bottom of your diff
- If you need to remove again a careful pry bar between the lip of the half shaft and the diff will release quite easily… But again, don’t break the snap ring!


That’s about it for today. I still have a bunch of post to write to catch up to where I am now. Please let me know any feedback you have on posting style or content and I may tweak things a bit